Remember that time you finally found the perfect piece of art, brought it home, and then…stared blankly at the wall, completely clueless about how to actually hang it? We’ve all been there! Maybe you tried the old “eyeball it” method, resulting in a slightly crooked masterpiece and a few extra holes in your drywall. Or perhaps you ventured into the hardware store, overwhelmed by the sheer volume of hooks, wires, and gadgets, leaving you more confused than when you started. Hanging pictures shouldn’t be a daunting task, and with the right guidance, it doesn’t have to be.
That’s why we’ve put together this comprehensive guide to the best picture hanging tools. We’ll explore the essential tools for any home decorator, from simple solutions for lightweight frames to heavy-duty options for larger artwork. No more guessing games or frustrating trips to the store. Get ready to learn about the products that will make your picture-hanging experience smooth, efficient, and dare we say, even enjoyable!
Before we jump into the best picture hanging tools review, let’s take a look at these Amazon products:


Last update on 2026-03-04 / Affiliate links / #CommissionsEarned / Images from Amazon Product Advertising API
Say Goodbye to Crooked Frames: Finding Your Picture Hanging Zen
Let’s be honest, hanging pictures can feel like a daunting task. You’ve got your beautiful artwork, a blank wall staring back at you, and a nagging fear of creating a lopsided gallery wall. We’ve all been there, right? Perhaps you’ve even experienced the frustration of making multiple holes only to find your picture still isn’t quite right. But fear not, because a perfectly curated space is within your reach, and it all starts with the right tools. Think of this as your guide to achieving picture-hanging nirvana, where level frames and perfectly aligned art become the norm, not the exception.
The good news is, you don’t need to be a professional to achieve professional-looking results. In fact, according to a recent survey, over 70% of homeowners attempt DIY picture hanging, showing just how common this task is. The key is preparation and having access to the best picture hanging tools. Gone are the days of relying solely on guesswork and a trusty hammer. With the right equipment, you’ll not only minimize mistakes, but you’ll also save time and energy, allowing you to focus on enjoying your thoughtfully decorated space.
So, what exactly constitutes the best picture hanging tools? It’s more than just a hammer and nails, though those are certainly essential. We’re talking about tools that take the guesswork out of placement, ensuring accuracy, stability, and a polished finish. Think laser levels that project perfect lines, picture hanging kits with varied hardware for different wall types, and even ingenious gadgets that help you find the perfect spot before you commit to making a hole.
We’re going to dive into the essential items that will transform you from a picture-hanging novice to a confident decorator. By understanding the purpose and benefits of each tool, you’ll be equipped to tackle any wall, any frame, and any vision you have for your home. So, grab a cup of coffee, settle in, and let’s explore the world of picture hanging, one perfectly aligned frame at a time!
The Best Picture Hanging Tools
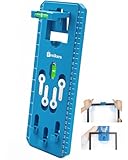
Hang-O-Matic Picture Hanging Tool
This tool is a lifesaver for anyone who’s ever struggled to hang a picture straight. The Hang-O-Matic brilliantly combines a measuring tape, level, and nail marker into one compact device. Simply position your picture on the wall, use the built-in level to ensure it’s straight, and then press the button to mark exactly where your nail needs to go. No more guessing, no more crooked pictures, and no more unnecessary holes in your wall!
The real beauty of the Hang-O-Matic lies in its simplicity. It’s incredibly easy to use, even for beginners. Plus, it works with a wide variety of picture frames, making it a versatile addition to any home improvement toolkit. If you value accuracy and convenience, the Hang-O-Matic is definitely worth the investment.
Franklin Sensors ProSensor T13 Stud Finder
Forget those old-fashioned stud finders that beep sporadically and leave you guessing. The Franklin Sensors ProSensor T13 uses a multi-sense array to detect studs with incredible accuracy. The ten LED lights illuminate instantly when a stud is found, giving you a clear and confident indication of its location. No more drilling exploratory holes!
Beyond its accuracy, the ProSensor T13 is also incredibly user-friendly. It’s wide enough to cover a significant area of the wall at once, speeding up the process of finding studs. It also eliminates the need for calibration, making it ready to use right out of the box. For serious DIYers or anyone who wants to avoid costly mistakes, the ProSensor T13 is an absolute must-have.
LevelMatePRO Wireless Vehicle Leveling System
While technically designed for leveling RVs and trailers, the LevelMatePRO is surprisingly useful for hanging multiple pictures in a perfectly straight line. This Bluetooth-enabled device connects to your smartphone and provides precise angle measurements. Place it against the wall, zero out the reading, and then easily ensure each picture is hung at the exact same angle.
This innovative device offers accuracy that traditional levels simply can’t match, ensuring a professional and consistent look. While pricier than other options, the LevelMatePRO is ideal for creating gallery walls or hanging large, heavy items that require absolute precision. It might seem like overkill for a single picture, but for achieving perfectly aligned results across multiple pieces, it’s a game changer.
Picture Hanging Strips by Command
For renters or those who dislike using nails, Command Picture Hanging Strips are a fantastic alternative. These adhesive strips are easy to apply and remove, leaving no damage to your walls. They come in various sizes to accommodate different weights, making them suitable for a wide range of pictures and decorations.
The convenience of Command Strips is undeniable. Simply attach the strips to the back of your picture frame and press it firmly against the wall. When it’s time to remove the picture, the strips peel off cleanly, leaving no residue or holes behind. While they might not be suitable for extremely heavy items, Command Strips are a great option for lightweight frames and decorations, offering a damage-free way to personalize your space.
OXO Good Grips Magnetic Nail Starter
This clever little tool is deceptively simple, yet incredibly useful for hanging pictures without smashing your fingers. The OXO Good Grips Magnetic Nail Starter holds your nail in place, allowing you to position it precisely and hammer it in without risking injury. The comfortable, non-slip grip makes it easy to handle, even for those with limited dexterity.
The magnetic nail starter is particularly helpful when working in tight spaces or with small nails. It eliminates the frustration of trying to hold the nail steady while hammering, making the whole process much safer and more efficient. For a small investment, the OXO Good Grips Magnetic Nail Starter offers significant peace of mind and makes picture hanging a much more enjoyable experience.
Why You Need Picture Hanging Tools (and Why You’ll Thank Us!)
Let’s face it, nobody enjoys staring at bare walls, right? We all crave a space that reflects our personality, our passions, and our treasured memories. But achieving that perfect gallery wall or simply showcasing your favorite artwork often involves a task many of us dread: hanging those darn pictures! It’s a common scenario: you find yourself holding a framed photo, eyeballing a spot on the wall, fumbling with a hammer and nail, and hoping for the best. Sound familiar? The result is often a crooked picture, a damaged wall, and a whole lot of frustration.
That’s where picture hanging tools come to the rescue! Forget the guesswork and potential disasters. The best picture hanging tools provide accuracy, efficiency, and most importantly, peace of mind. Imagine being able to effortlessly determine the exact placement of your artwork, ensuring it’s perfectly level and securely mounted the first time around. No more multiple attempts, no more unsightly nail holes, and no more second-guessing your decorating skills.
Investing in a quality picture hanging kit is an investment in your home’s aesthetic and your own sanity. These tools are designed to simplify the process, making it accessible to everyone, regardless of their DIY experience. Think of it as a one-time purchase that will save you countless hours of frustration and potentially costly wall repairs in the long run. From simple levelers to multi-functional hanging tools, the market offers a variety of options to suit different needs and budgets.
Ultimately, picture hanging tools empower you to transform your house into a home. They allow you to confidently display your cherished artwork and create a space that truly reflects your unique style. So, ditch the outdated methods, embrace the ease and precision of picture hanging tools, and say hello to perfectly hung pictures and walls you’ll be proud to show off. Trust us, your walls (and your sanity) will thank you!
Understanding Wall Types & Their Hanging Needs
Different wall types present unique challenges when it comes to hanging pictures. Drywall, for example, is relatively easy to penetrate but can crumble under significant weight without the right anchor. Brick or concrete walls, on the other hand, are incredibly sturdy but require specialized drill bits and anchors. Knowing your wall type is the first step in choosing the right hanging tools and preventing damage to your walls or your artwork.
Think about that gallery wall you’ve been dreaming of. Imagine using tiny nails on a brick wall! Disaster, right? Similarly, picture hanging strips might not be the best choice for a heavy mirror on a delicate drywall surface. Assessing the wall composition gives you the foundation for understanding which tools will give you the secure, reliable hold you’re after.
Consider the age of your home, too. Older homes might have plaster walls, which are more brittle than drywall and can crack easily if not handled carefully. Using a pilot hole and a gentle touch is essential when working with plaster. The right tools will help you avoid a mess and ensure your treasured pieces stay put.
Ultimately, taking the time to understand your wall type will save you headaches, repair costs, and the potential heartbreak of a fallen masterpiece. With the right information and the appropriate tools, you’ll be hanging art like a pro in no time.
Mastering Measurement & Placement for Perfect Alignment
Hanging a picture straight and at the right height can be surprisingly tricky. It’s not enough to just eyeball it! Accurate measurement and careful placement are essential for creating a visually appealing and balanced display. This involves using measuring tapes, levels, and sometimes even laser levels for the ultimate precision.
Imagine hanging a series of photos in a hallway. If they’re not aligned properly, the entire effect can look haphazard and unprofessional. Taking the time to measure the distance between each frame and ensuring they’re all at the same height will create a clean, cohesive look. A laser level can be particularly helpful for this type of project.
Think about the visual impact you want to create. Do you want your artwork to be at eye level? A good rule of thumb is to hang the center of the picture approximately 57 to 60 inches from the floor. This will ensure that it’s comfortable for most people to view.
Don’t forget to account for the size and shape of the artwork itself. A large piece might need to be hung a bit higher to avoid overwhelming the space, while a smaller piece might benefit from being grouped with other items to create a more impactful display. Measurement and placement are the unsung heroes of a beautiful gallery wall.
Essential Safety Practices for Picture Hanging
Hanging pictures might seem like a simple task, but safety should always be a top priority. This includes protecting yourself from potential injuries, as well as safeguarding your walls and your artwork. Wearing safety glasses, using appropriate ladders or step stools, and handling tools with care are all crucial for a safe and successful hanging experience.
Consider the weight of the item you’re hanging. A heavy mirror or a large canvas can be dangerous if not handled properly. Always have someone assist you when lifting and positioning heavy objects, and be sure to use sturdy ladders or step stools that can support the weight.
Think about the potential hazards in your work area. Make sure the floor is clear of clutter and that there are no electrical wires or pipes in the wall where you’re planning to drill or nail. Using a stud finder with an electrical wire detection function can help you avoid these potential hazards.
Remember to take breaks when needed. Hanging multiple pictures can be tiring, and fatigue can lead to mistakes and injuries. Take a few minutes to rest and re-focus before continuing, and always prioritize safety over speed. A careful, deliberate approach is always the safest approach when hanging pictures.
Maintaining Your Tools & Supplies for Long-Term Use
Investing in quality picture hanging tools is a smart decision, but it’s also important to maintain them properly to ensure their longevity and effectiveness. This includes cleaning your tools after each use, storing them in a safe and organized manner, and replacing worn or damaged items as needed.
Think about your drill bits, for example. After drilling into brick or concrete, they can become dull and less effective. Sharpening your drill bits or replacing them with new ones will ensure that they continue to perform at their best. Similarly, keeping your measuring tape clean and free of debris will help maintain its accuracy.
Consider investing in a dedicated toolbox or storage container to keep all of your picture hanging tools organized and easily accessible. This will not only prevent damage to your tools but also make it easier to find what you need when you’re ready to hang your next masterpiece.
Don’t forget about your consumables, such as nails, screws, and picture hanging strips. Store these items in a dry place to prevent rust or deterioration. Regularly check your supplies and replenish them as needed so you’re always prepared for your next hanging project. Proper maintenance ensures that your tools will be ready when you are.
Choosing the Best Picture Hanging Tools: A Friendly Guide
Hey there! Ready to finally tackle that gallery wall you’ve been dreaming of? Or maybe you just want to get that one lonely picture up and out of the hallway? Either way, the right tools make all the difference. Forget those frustrating afternoons wrestling with crooked frames and damaged walls. This guide is here to help you find the best picture hanging tools for your needs, so you can enjoy beautifully displayed art with minimal fuss. Let’s dive in!
Understanding Your Wall Type
Okay, friend, first things first: know thy wall! Seriously, this is probably the most important factor. You wouldn’t try to drive a nail into a brick wall with a tiny hammer, right? Similarly, different walls require different hanging solutions. Drywall, plaster, wood, brick, concrete – they all have their quirks. Before you even think about buying any best picture hanging tools, take a close look at your walls. Tap them, examine them, maybe even consult your building’s blueprints if you’re feeling extra thorough. This initial assessment will save you a ton of headache (and potentially expensive repairs) down the line.
Think of it this way: drywall is like that friend who’s easily overwhelmed. It’s soft and readily gives way, so lightweight pictures and gentle hanging methods are best. Brick and concrete, on the other hand, are like your super strong, dependable friend. They can handle heavy loads, but you’ll need heavy-duty anchors and tools to get the job done. Plaster is somewhere in the middle – a bit more delicate than brick, but sturdier than drywall. Choose your weapons wisely!
Considering the Weight of Your Art
Next up, let’s talk about weight. This is where things can get a little tricky, but it’s crucial for preventing your precious artwork from taking a nosedive. Honestly, underestimating the weight of a frame is a common mistake, and it’s a recipe for disaster. No one wants to find their favorite piece of art shattered on the floor! So, grab a kitchen scale or a bathroom scale and get an accurate measurement.
Once you know the weight, you can choose the appropriate best picture hanging tools. Remember to factor in the weight of the frame, the glass (if any), and the artwork itself. It’s always better to err on the side of caution and choose a hanging solution that can handle more weight than you think you need. You’ll be able to sleep better at night, trust me.
Evaluating Different Hanging Hardware Options
Now, let’s get into the nitty-gritty of hanging hardware. There are so many options out there – nails, screws, hooks, wires, adhesive strips, and more! It can feel overwhelming, but each has its pros and cons. Consider what kind of artwork you’re hanging, the weight of the piece, and the type of wall you’re working with.
For light items on drywall, adhesive strips or small nails might be sufficient. For heavier pieces, you’ll likely need anchors or screws that are designed to distribute the weight more evenly. Picture-hanging wire is a classic choice, but make sure it’s the right gauge for the weight of your art. And don’t forget about D-rings – they’re the little metal loops on the back of your frame that the wire attaches to. Make sure they’re securely fastened! Choosing the correct hardware is vital for ensuring your art looks great and stays put.
Choosing the Right Leveling Tools
A crooked picture can ruin an entire room. It’s like a tiny, nagging imperfection that you can’t unsee. That’s why having the right leveling tools is essential. The classic bubble level is a must-have for any DIY enthusiast. It’s simple, reliable, and relatively inexpensive. But there are also more advanced options available, such as laser levels, which can project a perfectly straight line across your wall.
Regardless of which type you choose, make sure your level is accurate. Test it on a known level surface before you start hanging anything. A digital level can be a great choice here. And here’s a pro tip: if you’re hanging multiple pictures in a row, use a long level to ensure that they’re all aligned perfectly. Even the best picture hanging tools will not hide crookedness!
Considering Wall Protection
Okay, let’s talk about protecting your walls. Hanging pictures inevitably involves making holes, but you can minimize the damage with a little forethought. First, consider using picture-hanging strips that are designed to be removable without damaging the paint. These are great for lightweight items, but they might not be strong enough for heavier pieces.
If you’re using nails or screws, try to insert them into existing holes whenever possible. And if you need to create new holes, use a drill bit that’s slightly smaller than the screw or anchor you’re using. This will help prevent the drywall from crumbling. Finally, consider using felt pads on the back of your frames to protect your walls from scratches.
Investing in a Good Stud Finder
Finding a stud in your wall is like finding a hidden treasure. It’s a strong, stable point to anchor your artwork, and it can significantly reduce the risk of your picture falling down. A good stud finder is an invaluable tool for any homeowner, whether you’re hanging pictures or mounting shelves.
There are two main types of stud finders: magnetic and electronic. Magnetic stud finders detect the metal fasteners that are used to attach the drywall to the studs. Electronic stud finders use sensors to detect changes in density in the wall. Both types have their pros and cons, so choose the one that best suits your needs. Remember that sometimes, a little bit of detective work is required to ensure your artwork is safely secured.
Considering a Picture Hanging Kit
If you’re just starting out, or if you want to have a variety of hanging options on hand, consider buying a picture hanging kit. These kits typically include a selection of nails, screws, hooks, wires, and other essential hardware. They’re a convenient and affordable way to stock up on the best picture hanging tools.
A good picture hanging kit should also include a level, a measuring tape, and a pencil for marking your measurements. Look for kits that are well-organized and easy to use. And don’t be afraid to add your own tools and supplies as you gain experience. Over time, you’ll develop your own personal collection of best picture hanging tools that you can rely on for years to come. With the right tools and a little bit of patience, you can transform your walls into a beautiful display of art.
Frequently Asked Questions
What’s the most important thing to consider when choosing picture hanging tools?
That’s a great question! The most important thing is to think about the types of walls you’ll be hanging on and the weight of your artwork. Drywall, plaster, brick, and concrete each require different tools and techniques. Trying to use a tiny nail on a heavy frame or attempting to hammer a nail into brick will just lead to frustration (and possibly damaged walls!).
Consider the weight capacity of the hanging hardware and whether you need stud finders to locate secure anchor points. Also, think about how level your artwork is and whether you need a laser level or simple level to ensure proper placement. Choosing the right tools based on your wall type and art weight will make the entire process much smoother and more successful.
How do I know if I need a stud finder?
You’ll definitely want a stud finder if you’re hanging anything heavy, like a large mirror or a picture frame filled with multiple photos. Hanging heavy items on just drywall can cause them to fall and potentially damage your artwork or even injure someone. Studs provide a much stronger anchor point because they’re part of the wall’s structural framing.
Even for lighter items, using a stud finder can be beneficial for a more secure hold, especially in high-traffic areas or if you’re concerned about the longevity of your hanging. You can always use drywall anchors if you can’t find a stud where you want to hang your art, but using a stud is always the preferable solution if possible.
Are laser levels really worth the extra cost?
Laser levels can be a real game-changer, especially if you’re hanging multiple pictures in a row or creating a gallery wall. They project a perfectly straight line, which makes it incredibly easy to align everything accurately. This saves you from constantly stepping back and adjusting things with a traditional level.
While a traditional bubble level will definitely work, a laser level offers a level of precision and convenience that can be especially helpful for larger projects or for those who are perfectionists. Plus, some laser levels can also project vertical lines, which is perfect for hanging items in corners or aligning shelves. If you hang pictures frequently, the investment is definitely worth it.
What are the best options for hanging pictures on plaster walls?
Plaster walls can be a bit tricky because they’re more prone to cracking than drywall. The key is to avoid using large nails that can shatter the plaster. Instead, consider using picture-hanging hooks specifically designed for plaster walls. These hooks have small, thin nails that minimize the risk of damage.
Another great option is to use adhesive strips designed for hanging pictures. These strips are strong enough to hold many lightweight frames and can be removed without leaving any holes or marks. If you’re hanging something heavy on a plaster wall, you’ll need to use a plaster screw with an anchor. The best way to do this is to pre-drill your hole with a small drill bit before inserting the screw.
What if I don’t want to use nails or screws at all?
No problem! There are several excellent nail-free options available these days. Adhesive strips, as we mentioned earlier, are a fantastic choice for lightweight items. Just be sure to choose strips that are rated for the weight of your picture. Also, clean the wall surface thoroughly before applying the strips to ensure a strong bond.
Another option is to use specialized hanging tapes that are designed to hold heavier objects without damaging the wall. These tapes are often double-sided and can be removed without leaving residue. Keep in mind that the effectiveness of these products can vary depending on the wall surface and the weight of the item, so always test them in an inconspicuous area first.
How do I avoid damaging my walls when hanging pictures?
Protecting your walls is essential! Always use the right tools for the job. Using a hammer that’s too large or a nail that’s too thick can cause unnecessary damage. Also, avoid hammering directly into the wall without using a nail-setting tool. This tool helps prevent the hammer from slipping and damaging the surrounding area.
Consider using painter’s tape to mark the spot where you want to hang your picture. This will not only help you visualize the placement but also protect the wall surface when you’re hammering. Finally, when removing nails or screws, use a putty knife or a screwdriver to gently pry them out, minimizing the risk of chipping or cracking the paint.
What are some essential safety tips I should keep in mind?
Safety first! Always wear safety glasses when hammering or drilling to protect your eyes from flying debris. If you’re using power tools, make sure to read the manufacturer’s instructions carefully and wear appropriate safety gear, such as gloves and a dust mask.
When working on a ladder, be sure to place it on a stable surface and have someone hold it for extra security. Avoid overreaching, and always maintain three points of contact. Also, if you’re unsure about anything, don’t hesitate to ask for help from a professional. It’s always better to be safe than sorry when it comes to home improvement projects.
Final Thoughts
So, there you have it – your guide to finding the best picture hanging tools to transform your walls from bare to beautiful! Remember, this isn’t just about hanging pictures; it’s about creating a space that reflects your personality and tells your story. Don’t be intimidated! With the right tools and a little bit of planning, you can achieve gallery-worthy results.
Now it’s time to take the plunge! Armed with this knowledge, you’re well-equipped to choose the perfect tools for your next hanging project. Unleash your inner artist, grab those best picture hanging tools, and start making your house a home, one perfectly hung picture at a time. We’re confident you’ll create something amazing!