Remember that day I was on set, trying to nail the perfect sunset shot? The sky was ablaze with color, but my monitor was lying to me! What I thought was a vibrant, dynamic scene turned out to be a muddy mess in post. It was a painful lesson learned: relying solely on your eyes simply isn’t enough when you’re chasing professional-grade video. That’s when I started diving deep into the world of waveform monitors and, more importantly, histograms. A reliable histogram allows you to quickly and accurately assess exposure and color distribution, saving you countless hours in the editing suite.
If you’ve ever found yourself battling inconsistent footage, washed-out highlights, or crushed shadows, you’re in the right place. This guide is dedicated to helping you find the best histogram video monitors on the market. We’ve meticulously researched and reviewed a range of options, considering factors like accuracy, resolution, features, and of course, budget. Whether you’re a seasoned pro or just starting out, we’ll help you find the perfect monitor to elevate your video production game.
Before we jump into the best histogram video monitors review, let’s take a look at these Amazon products:


Last update on 2025-11-23 / Affiliate links / #CommissionsEarned / Images from Amazon Product Advertising API
Seeing is Believing: Understanding Histograms and Why You Need a Great Monitor
Ever find yourself wondering why that footage you thought looked amazing on set looks a little…off…when you bring it into post-production? We’ve all been there. It’s like the photo you took looks nothing like it did on your phone’s screen. More often than not, the culprit is your exposure and how you’re judging it in the field. That’s where histograms come in—they’re your secret weapon for achieving perfect exposure, and understanding them is essential for any serious videographer. Think of a histogram as a visual representation of the tonal range in your image, a graph showing the brightness values of your pixels, and more importantly, a reliable way to read the light, rather than relying on your eye.
For videographers, a reliable histogram display is non-negotiable, especially when shooting in challenging lighting conditions. These helpful graphs are even more critical when shooting in LOG profiles, which often appear flat and desaturated on a standard monitor. Without the proper tools, you might unknowingly crush your blacks or blow out your highlights. That’s why investing in one of the best histogram video monitors is a smart move. According to a recent survey, professional videographers who regularly use histograms during shooting report a 20% reduction in post-production color correction time. The right monitor with a clear, accurate histogram can truly streamline your workflow.
Now, you might be thinking, “Okay, I get histograms, but why a dedicated monitor?” Well, while many cameras have built-in histograms, the screens are often small and difficult to see clearly, especially in bright sunlight. External monitors offer a larger, brighter, and more accurate display, allowing you to make critical exposure decisions on the fly. They also often include additional features like waveform monitors, vectorscopes, and focus peaking, making them powerful tools for any filmmaker or content creator.
Choosing from the best histogram video monitors requires a little research, but the payoff is well worth it. We’re here to guide you through the options, explaining the key features to look for, and highlighting some of the top-performing monitors on the market. Get ready to take your exposure game to the next level!
Top 5 Best Histogram Video Monitors
SmallHD Cine 7
The SmallHD Cine 7 is a real powerhouse for filmmakers who demand accuracy and reliability. Boasting a stunningly bright display, this monitor cuts through glare like butter, making it perfect for outdoor shooting. But it’s not just about brightness; the color accuracy is superb, ensuring that what you see on the monitor is what you get in your final edit. The integrated waveform and histogram tools are incredibly intuitive, allowing users to quickly analyze exposure and color balance with ease.
Beyond its image quality, the Cine 7 shines in its build quality and versatility. It’s rugged enough to handle the rigors of on-location work, and its modular design means you can customize it to fit your specific needs. Whether you’re using it as a director’s monitor or for focus pulling, the Cine 7’s wide range of features, including 3D LUT support and customizable page layouts, makes it an indispensable tool for any serious filmmaker.
Atomos Shinobi SDI
The Atomos Shinobi SDI is a fantastic choice for filmmakers seeking a lightweight and feature-rich monitoring solution. Its compact design makes it ideal for gimbal setups or situations where portability is paramount. Don’t let its size fool you though; the Shinobi SDI is packed with features including a bright, accurate display and comprehensive monitoring tools like waveform, vectorscope, and of course, a histogram. These tools make dialing in the perfect exposure and color a breeze, even in challenging lighting conditions.
What truly sets the Shinobi SDI apart is its user-friendly interface and intuitive controls. Navigating through the menus is a snap, and the responsive touchscreen makes adjustments quick and precise. The ability to load custom LUTs adds even more flexibility, allowing you to preview your final look on set. For filmmakers on the go who need a reliable and accurate monitor, the Atomos Shinobi SDI is a top contender.
Blackmagic Video Assist 7″ 12G HDR
The Blackmagic Video Assist 7″ 12G HDR is a robust and versatile monitor that offers a lot of bang for the buck. This monitor isn’t just for viewing; it’s also a full-fledged recorder, allowing you to capture high-quality ProRes or DNx files directly from your camera. The bright, HDR-capable display delivers accurate colors and excellent contrast, making it easy to assess your footage in a variety of lighting situations. The built-in histogram, waveform, and vectorscope provide invaluable feedback for ensuring proper exposure and color balance.
Beyond its recording capabilities, the Video Assist 7″ 12G HDR excels in its connectivity options. With multiple SDI and HDMI inputs and outputs, it seamlessly integrates into any workflow. The intuitive touchscreen interface makes it easy to navigate the menus and adjust settings on the fly. For filmmakers who need a reliable monitor and recorder in one, the Blackmagic Video Assist 7″ 12G HDR is a compelling option.
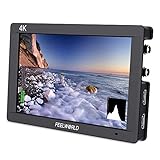
Feelworld LUT7 PRO
The Feelworld LUT7 PRO is a budget-friendly option that doesn’t skimp on features. Its bright, daylight-viewable display makes it easy to monitor your footage even in bright sunlight, a crucial asset for outdoor shoots. The monitor offers a comprehensive suite of monitoring tools, including waveform, vectorscope, and a detailed histogram, empowering you to fine-tune your exposure and color balance with precision.
Despite its affordability, the LUT7 PRO boasts a solid build quality and a user-friendly interface. The touchscreen display is responsive, and the menus are well-organized, making it easy to access the features you need. The ability to load custom LUTs allows you to preview your final look on set, ensuring that your vision is accurately captured. For filmmakers looking for a capable and affordable monitoring solution, the Feelworld LUT7 PRO is definitely worth considering.
Portkeys BM5 WR
The Portkeys BM5 WR is a monitor that blends affordability with some seriously impressive features. Its clear and bright display offers good color accuracy, allowing you to confidently assess your footage. What sets the BM5 WR apart is its wireless camera control capabilities, allowing you to adjust camera settings directly from the monitor, streamlining your workflow and giving you more control on set. Of course, it includes essential monitoring tools like waveform, vectorscope, and a detailed histogram.
The Portkeys BM5 WR also shines in its ruggedness and portability. Its durable construction can withstand the demands of location shooting, while its compact size makes it easy to integrate into various setups. The intuitive touchscreen interface and customizable buttons further enhance its usability. For filmmakers who want a feature-rich monitor with wireless camera control capabilities without breaking the bank, the Portkeys BM5 WR is a smart choice.
Why You Need a Histogram Video Monitor
Ever filmed a beautiful sunset, only to find it looks washed out and dull on your computer? Or perhaps captured a vibrant outdoor scene that ends up looking muddy and underexposed? The culprit is often exposure – the amount of light captured in your shot. Your camera’s built-in screen can be deceiving, and without proper monitoring, you’re essentially flying blind. A histogram video monitor solves this problem by providing a precise visual representation of the tonal range in your video, showing you exactly where your image is bright, dark, and everything in between.
Think of it like this: imagine baking a cake without a recipe. You might guess the ingredients and measurements, but chances are it won’t turn out as delicious as you hoped. Similarly, shooting video without a histogram is like guessing the exposure. A histogram monitor gives you the recipe for a perfectly exposed image, allowing you to make real-time adjustments to your camera settings and avoid costly errors in post-production. The best histogram video monitors offer features like waveform and vectorscope displays too, offering even more data about your video signal.
These monitors aren’t just for professionals; they’re for anyone serious about creating high-quality video. Whether you’re a budding filmmaker, a seasoned YouTuber, or a social media content creator, a histogram video monitor empowers you to capture stunning footage with accurate colors and dynamic range. Say goodbye to hours spent fixing exposure issues in editing – with a reliable histogram monitor, you’ll be able to nail the perfect exposure every time.
Investing in the best histogram video monitor is an investment in your craft. It’s the key to unlocking your camera’s full potential and achieving professional-looking results. You’ll gain confidence knowing that your footage is properly exposed, enabling you to focus on creativity and storytelling, rather than fixing technical problems. So, ditch the guesswork and embrace the precision of a histogram monitor – your videos (and your audience) will thank you for it!
Calibrating Your Histogram Monitor: A Step-by-Step Guide
So, you’ve got your new histogram monitor! Congratulations. But unpacking it is only the first step. To really harness its power, you need to calibrate it properly. Think of it like tuning a musical instrument; until you’ve got it just right, you’re not going to hear the full potential of the piece. Calibration ensures your monitor displays colors and luminance accurately, giving you a true representation of your footage.
The first thing to do is find a suitable environment. A dimly lit room is ideal, free from any strong ambient light that could skew your perception. Grab a color chart (like a Datacolor SpyderCheckr or an X-Rite ColorChecker Passport) – these are your reference points. Place it in front of your camera under consistent lighting and record a short clip. This clip will become your calibration source in your editing software.
Next, fire up your editing software, such as Adobe Premiere Pro or DaVinci Resolve, and import your color chart clip. Now, compare the colors displayed on your histogram monitor with the actual color chart. You’ll likely find discrepancies, especially in the extremes of the color spectrum and luminance levels. This is where the calibration tools in your monitor come into play.
Use the monitor’s built-in controls, often found in the menu, to adjust settings like brightness, contrast, saturation, and color temperature. The goal is to get the colors on your histogram monitor to match the color chart as closely as possible. This might take some fine-tuning and iterative adjustments, but the payoff in accurate color representation is well worth the effort.
Understanding Waveform vs. Vectorscope: Which is Right for You?
The world of video monitoring can feel like alphabet soup with all the different scopes and displays. Two of the most common tools you’ll encounter are the waveform monitor and the vectorscope. While both are designed to help you analyze your video signal, they provide different types of information. Think of them as two different lenses through which you can examine your footage.
A waveform monitor primarily displays luminance information—the brightness levels in your video. It plots the brightness of each pixel along a vertical axis, with darker areas at the bottom and brighter areas at the top. This is incredibly useful for ensuring proper exposure, avoiding clipping (where highlights are blown out and lose detail), and maintaining consistent brightness across shots. Imagine you’re filming a scene outdoors with the sun constantly shifting; the waveform will help you keep your exposure consistent.
The vectorscope, on the other hand, focuses on color. It displays the saturation and hue of your video signal. Imagine it as a circular map where each color has its designated location. The further away a color point is from the center, the more saturated it is. This is invaluable for ensuring accurate color balance, identifying color casts, and creating a specific color grade. Think of a music video where you want to create a highly stylized look with vibrant, specific colors; the vectorscope will be your best friend.
So, which one should you use? The answer is, ideally, both! They provide complementary information. Use the waveform to ensure your exposure is balanced and your blacks and whites are where they should be, and then use the vectorscope to ensure your colors are accurate and consistent. Over time, understanding how to interpret both of these tools will drastically improve the quality and consistency of your video work.
Troubleshooting Common Histogram Monitor Issues
Even the best equipment can sometimes run into hiccups, and your histogram monitor is no exception. Knowing how to troubleshoot common issues can save you time and frustration. Let’s say you’re on set and suddenly your monitor is displaying a scrambled image; panic doesn’t help, but a little troubleshooting knowledge will.
One frequent issue is signal loss or interference. Check your cables – are they securely connected to both the monitor and your camera or editing device? Are there any kinks or damage to the cables? Try swapping out the cable with a known working one. It’s always a good idea to keep a spare cable in your kit. Think of it like having a spare tire for your car; you hope you never need it, but you’re thankful when you do.
Another common problem is incorrect color calibration. If you’re finding that your monitor’s colors don’t match what you’re seeing in other displays, revisit your calibration settings. Use a color chart and follow the calibration steps outlined earlier. Remember, even slight variations in ambient lighting can affect your perception, so ensure your environment is consistent during the calibration process.
Finally, check for software or firmware updates for your monitor. Manufacturers often release updates that fix bugs, improve performance, and add new features. An outdated firmware version can sometimes lead to unexpected behavior. Just like your phone or computer, keeping your monitor’s software up-to-date is important for optimal performance. A quick visit to the manufacturer’s website can often resolve many issues.
Integrating Your Histogram Monitor Into Your Workflow
A histogram monitor isn’t just a piece of equipment; it’s a powerful tool that can streamline your entire video production workflow. From pre-production to post-production, it can help you make informed decisions and achieve consistent results. Consider a documentary filmmaker who needs to capture diverse environments; a histogram monitor becomes their eye in the field.
In pre-production, use your monitor to evaluate lighting conditions and plan your shots accordingly. A quick check of the histogram and waveform can help you determine if you need to add fill light or adjust your camera settings to achieve the desired exposure. This can save you valuable time and resources on set. Imagine scouting a location with harsh sunlight; your monitor will help you plan the best time of day to shoot or the necessary diffusion techniques to employ.
During production, your histogram monitor becomes your real-time quality control. Constantly monitor your exposure and color balance to ensure that your footage is technically sound. This is especially important when shooting in challenging conditions, such as rapidly changing light or environments with complex color palettes. It allows you to catch potential problems before they become major issues in post. A common example is capturing live events; the waveform will keep your exposure correct as the light changes.
In post-production, your histogram monitor is essential for color grading and editing. Use it to ensure that your shots are consistently exposed and that your colors are balanced. This will help you create a cohesive and professional-looking final product. Furthermore, having consistent and accurate data allows you to batch edit similar shots to maintain the same look. The value of a histogram monitor shines through when working on client work and needing to adhere to a project’s visual guidelines.
Your Friendly Guide to Finding the Best Histogram Video Monitors
Hey there, fellow video enthusiast! So, you’re on the hunt for a histogram monitor, huh? Fantastic choice! These little (or sometimes big!) gadgets are absolute lifesavers when it comes to nailing exposure and ensuring your footage looks its absolute best. But with so many options out there, figuring out where to even begin can feel a bit overwhelming. Don’t worry, that’s where I come in.
Consider me your friendly neighborhood video guru, ready to break down everything you need to know to find the best histogram video monitors for your specific needs. This isn’t about getting bogged down in technical jargon; it’s about understanding what features matter and why they matter. Let’s dive in and get you one step closer to capturing perfectly exposed masterpieces!
1. Histogram Display Accuracy: Trust What You See
First things first, the heart of any histogram monitor is, well, the histogram itself! But not all histograms are created equal. You want a display that accurately reflects the luminance distribution in your image. A poorly calibrated or inaccurate histogram is worse than useless; it’s misleading! So, how do you ensure you’re getting a reliable read?
Look for monitors that boast a high level of precision in their histogram display. Read reviews and see what other users say about the accuracy. Does the histogram truly represent the distribution of light and dark in their image? Can they rely on the information to make exposure adjustments? And remember, don’t solely rely on the monitor’s brand name; sometimes, lesser-known brands offer surprisingly accurate displays. The best histogram video monitors are those that allow you to trust what you see on the screen, leading to confident exposure decisions.
2. Monitor Size and Portability: Finding Your Sweet Spot
Think about where you’ll be using your monitor the most. Are you primarily shooting in a studio setting, or are you constantly on the go? A larger monitor offers a more comfortable viewing experience, especially for detailed work. However, lugging around a massive screen on location can quickly become a burden.
Smaller, more portable monitors are ideal for run-and-gun filmmaking, documentaries, or any situation where you need to travel light. But be mindful of the screen size; squinting at a tiny display for hours isn’t ideal. Finding that sweet spot between screen real estate and portability is crucial. The best histogram video monitors will seamlessly integrate into your workflow, whether you’re stationary or always on the move, making your life easier not harder.
3. Brightness and Contrast Ratio: Seeing Clearly in Any Light
This is a big one, especially if you’re shooting outdoors in bright sunlight. A monitor with low brightness will be practically useless in such conditions, forcing you to guess at your exposure. Look for a monitor with a high brightness rating (measured in nits or cd/m²). Aim for at least 400 nits for decent outdoor visibility, and ideally 1000 nits or more for truly bright conditions.
Contrast ratio is another important factor. It determines the difference between the brightest white and the darkest black that the monitor can display. A higher contrast ratio means a more vibrant and detailed image, allowing you to better discern subtle nuances in your exposure. The best histogram video monitors provide excellent visibility and accurate representation of your footage, regardless of the lighting conditions. They allow you to see what you’re actually capturing, leading to fewer surprises in post-production.
4. Input and Output Options: Connectivity is Key
Make sure the monitor has the necessary input and output ports to connect to your camera and other equipment. HDMI and SDI are the most common video input options. HDMI is generally sufficient for most consumer and prosumer cameras, while SDI is more common in professional broadcast environments due to its superior signal stability and longer cable runs.
Consider whether you need loop-through capabilities, which allow you to output the video signal to another monitor or device. Audio input and output options can also be useful for monitoring audio levels. Check what formats the monitor supports to ensure it matches the signal output of your camera. After all, the best histogram video monitors can’t help you if they can’t properly connect to your devices. A versatile range of ports ensures seamless integration into your existing setup.
5. Additional Monitoring Tools: More Than Just a Histogram
While the histogram is your primary focus, many monitors offer a suite of other helpful tools that can enhance your workflow. Waveform monitors provide a more detailed view of luminance levels across the image, allowing for precise exposure adjustments. Vectorscopes are invaluable for checking color balance and saturation.
False color displays can help you identify specific luminance ranges, making it easier to dial in your exposure quickly. Focus peaking highlights areas that are in sharp focus, ensuring critical sharpness. Zebra stripes indicate overexposed areas, preventing blown-out highlights. The best histogram video monitors provide a comprehensive suite of monitoring tools that empower you to make informed decisions on set, leading to better-looking footage overall.
6. Power Options: Staying Charged on Location
Consider how you’ll be powering your monitor. Will you be primarily using it in a studio with access to AC power, or will you be relying on batteries in the field? If you’re shooting on location, battery life is crucial. Look for monitors that offer long battery runtimes and support for various battery types.
External battery plates can be a great option, allowing you to use larger, more powerful batteries for extended shooting sessions. Make sure the monitor is compatible with common battery standards like Sony NP-F or Canon LP-E6. Some monitors also support powering via USB-C, which can be convenient for certain situations. The best histogram video monitors don’t leave you stranded with a dead screen in the middle of a crucial shot. Reliable power options are essential for uninterrupted workflow and peace of mind.
7. Budget Considerations: Balancing Features and Affordability
Let’s be real, budget always plays a role. Histogram monitors range in price from a few hundred dollars to several thousand. It’s easy to get caught up in all the bells and whistles, but resist the urge to overspend on features you don’t really need. Carefully assess your needs and prioritize the features that are most important to you.
Don’t automatically assume that the most expensive monitor is the best. Sometimes, you can find excellent value in more affordable options. Read reviews, compare specs, and do your research to find a monitor that offers the best balance of features and affordability for your budget. The best histogram video monitors aren’t necessarily the most expensive; they are the ones that provide the most value and meet your specific needs without breaking the bank. Happy shooting!
Frequently Asked Questions
What exactly is a histogram on a video monitor, and why do I need one?
Think of a histogram as a visual representation of the brightness levels in your video image, from the darkest blacks to the brightest whites. It’s like a little graph that shows you how much of each brightness level exists in your shot. A good histogram gives you instant feedback about your exposure, helping you avoid common mistakes like blowing out highlights or crushing shadows.
Basically, it’s a powerful tool for getting the most detail and dynamic range out of your footage. Without it, you’re relying solely on your eye, which can be tricked by different lighting conditions and the monitor’s own settings. By using the histogram, you can ensure your exposure is balanced and capture the most usable information for post-production.
How do I read a histogram on a video monitor? It looks complicated!
Don’t worry, it’s simpler than it looks! The left side of the histogram represents the darkest areas of your image (blacks), while the right side represents the brightest areas (whites). The height of the graph at any given point indicates how much of that specific brightness level exists in your shot.
Ideally, you want the histogram to be fairly balanced, with a good distribution of tones across the entire range. If the graph is heavily weighted towards the left, your image might be underexposed (too dark). If it’s skewed to the right, it might be overexposed (too bright). Think of it as a guide to help you adjust your camera settings for the best exposure!
What are the key features I should look for in a histogram video monitor?
Beyond just having a histogram, consider the accuracy and clarity of its display. A monitor with a bright, clear screen and adjustable settings for the histogram’s size and position will make it easier to read in different lighting conditions. Color accuracy is also crucial, as you want to be sure the monitor isn’t misleading you about the true colors in your footage.
Also, think about other helpful tools. Some monitors offer waveform monitors (similar to histograms but showing signal strength by line) and vectorscopes (for color analysis), which can be incredibly valuable for precise exposure and color grading. Features like focus peaking, zebras, and false color can further assist you in getting the perfect shot!
Is a histogram monitor only for professionals, or can beginners benefit from it too?
Absolutely, beginners can benefit just as much, if not more! While seasoned pros rely on histograms, they’re incredibly useful for new videographers learning the ropes. It provides immediate feedback and helps train your eye to recognize proper exposure.
Using a histogram removes the guesswork and allows you to understand how changes in aperture, ISO, and shutter speed affect your image in a tangible way. It’s a fantastic learning tool that will quickly improve your understanding of exposure and color grading. You’ll become a better videographer in no time!
What’s the difference between a histogram on my camera and one on an external monitor?
The histogram on your camera is a great starting point, but an external monitor offers several advantages. First, it’s usually much larger and easier to read, especially in bright sunlight. Second, external monitors often have more advanced histogram features, such as luma and RGB parade histograms.
Plus, an external monitor allows you to see a larger and more detailed image of your footage, which is essential for making critical focusing and exposure decisions. Think of your camera’s histogram as a quick reference, and your external monitor’s histogram as a more precise and comprehensive tool.
How much should I expect to spend on a good histogram video monitor?
The price range can vary quite a bit depending on the size, features, and brand of the monitor. You can find decent entry-level options starting around a few hundred dollars. These usually have basic histogram functionality and a smaller screen size.
For more advanced features, better color accuracy, and larger screen sizes, you can expect to spend upwards of a thousand dollars. Investing in a quality monitor is worth it if you’re serious about your video work, as it will pay off in terms of improved image quality and efficiency in post-production.
Can I use a regular computer monitor as a substitute for a dedicated video monitor with a histogram?
While technically you can use a regular computer monitor, it’s not really ideal for critical video work. Computer monitors aren’t typically designed for the same level of color accuracy or brightness as dedicated video monitors. Plus, they usually lack the built-in histogram and other video-specific tools.
You’d need to rely on external software for the histogram, which can be clunky and less convenient than having it built directly into the monitor. While it might be a temporary solution, investing in a proper video monitor with a histogram will ultimately give you more accurate and reliable results.
Final Thoughts
So, there you have it! We’ve explored the world of the best histogram video monitors, dissected their features, and hopefully, given you the knowledge to confidently choose the perfect one for your creative journey. Remember, a great monitor isn’t just a screen; it’s a powerful tool that unlocks your full potential, helping you capture and craft visuals that truly shine.
Now it’s time to take the leap! Dive into the specifics, compare your options, and trust your gut. The best histogram video monitor is out there waiting for you to harness its power and elevate your work. Go forth, create, and inspire!