Remember that leaky roof last spring? Raindrops dancing a jig on the living room floor, a frantic scramble for buckets and towels, and the dawning realization that a roofing project was looming. Turns out, a big part of the problem was failing nails – old, rusty, and just plain not up to the job. After much research, price comparisons, and a healthy dose of YouTube tutorials, I learned that having the right tools makes all the difference. And when it comes to roofing, the cornerstone of a successful project is undoubtedly the nailer.
Choosing the best roofing nailer, however, felt like navigating a minefield of technical specs and confusing jargon. Cordless vs. pneumatic, coil vs. stick, depth adjustment features – the options seemed endless! That’s why we’ve put together this comprehensive guide, designed to cut through the noise and help you find the perfect nailer for your needs, whether you’re a seasoned professional or a DIY enthusiast tackling your first roofing repair. Get ready to nail it!
Before we jump into the best roofing nailer review, let’s take a look at these Amazon products:


Last update on 2026-03-19 / Affiliate links / #CommissionsEarned / Images from Amazon Product Advertising API
So, You’re Ready to Tackle That Roof? Let’s Talk Nailers!
Alright, picture this: You’re staring up at your roof, maybe a few shingles flapping in the breeze, or perhaps you’re building a brand new structure. Either way, you know you need a reliable tool to get those shingles securely fastened. Hand nailing? Been there, done that. Sore arms and uneven results are no fun! That’s where a roofing nailer comes in. It’s the key to a professional-looking and long-lasting roof, and let’s be honest, saving your sanity in the process.
But with so many options out there, finding the best roofing nailer for your needs can feel a little overwhelming. Don’t worry; we’re here to break it down. Think of this as your friendly guide to navigating the world of roofing nailers. We’ll explore the different types, features to consider, and even some top contenders that stand out from the crowd.
Now, consider this: a properly installed roof can last anywhere from 20 to 50 years, depending on the materials used. But even the best shingles won’t hold up if they’re not nailed down correctly. According to the National Roofing Contractors Association (NRCA), improper nail placement is a leading cause of roof failure. That’s why having the right nailer, and knowing how to use it, is absolutely essential.
Ultimately, choosing the best roofing nailer is a personal decision based on your specific needs and budget. Whether you’re a seasoned pro or a weekend warrior, we’ll help you find the perfect tool to make your roofing project a success. Let’s dive in and get those shingles secured!
5 Best Roofing Nailer
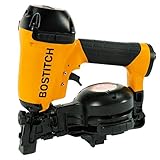
BOSTITCH RN46-1 Roofing Nailer
Looking for a roofing nailer that can keep up with you all day long? The BOSTITCH RN46-1 is a powerhouse built for speed and durability. Its lightweight design prevents fatigue during long projects, while the high-speed motor ensures nails are driven flush every time. The adjustable depth guide allows for precise nail placement, preventing overdriving and damage to shingles. This nailer also boasts a single-action side load canister, making reloading quick and painless.
This roofing nailer is designed with user comfort in mind. The rubber grips minimize vibrations, and the shingle guide helps maintain consistent spacing. Durability is another key feature, with a hardened steel wear plate protecting the tool from damage on abrasive surfaces. If you’re a professional roofer needing a reliable and efficient tool, the BOSTITCH RN46-1 is a strong contender.
Metabo HPT NV45R(S) Roofing Nailer
The Metabo HPT NV45R(S) roofing nailer is a reliable and versatile tool designed for both professional and DIY users. This nailer stands out with its fast and consistent performance, driving nails with precision and power. The side-loading magazine is easy to load, saving time and reducing frustration. Plus, its lightweight design makes it comfortable to use for extended periods without causing excessive fatigue.
What makes this roofing nailer a great pick is its combination of durability and user-friendly features. The tool-less depth adjustment allows for quick changes based on the material being used, and the carbide wear plates increase the tool’s lifespan. The rubber grip provides a secure and comfortable hold, and the overall design ensures easy maneuverability on the roof.
Paslode 902000 Cordless Roofing Nailer
Say goodbye to tangled hoses and noisy compressors with the Paslode 902000 Cordless Roofing Nailer. This revolutionary tool offers unmatched freedom and convenience, allowing you to move around the roof with ease. Its cordless design eliminates the hassle of traditional pneumatic nailers, making setup and takedown a breeze. The fuel-powered operation delivers consistent power, ensuring nails are driven flush every time.
Beyond its cordless convenience, this Paslode roofing nailer boasts impressive performance. The compact and lightweight design reduces fatigue, even on long jobs. The easy-to-adjust depth of drive allows for precise nail placement, preventing damage to roofing materials. It’s a great choice for anyone looking to streamline their roofing projects and work more efficiently.
DEWALT DW45RN Roofing Nailer
The DEWALT DW45RN Roofing Nailer is a solid choice for professionals seeking reliability and power. This nailer consistently drives nails into various roofing materials with ease, ensuring a secure and lasting hold. The tool-free depth adjustment is incredibly convenient, allowing for quick adaptations to different shingle types. It’s also known for its robust construction, designed to withstand the demands of daily use on the job site.
This roofing nailer shines in its user-friendly design. The lightweight construction reduces fatigue during extended use, and the comfortable grip enhances control and accuracy. The fast, sequential trigger offers precise nail placement, while the high-capacity magazine minimizes downtime for reloading. Overall, the DEWALT DW45RN is a dependable workhorse that will help you get the job done efficiently and effectively.
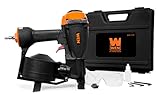
Freeman PCN45 Pneumatic Roofing Nailer
For budget-conscious homeowners and DIY enthusiasts, the Freeman PCN45 Pneumatic Roofing Nailer offers excellent value without sacrificing performance. This nailer provides consistent and reliable nail driving, making it suitable for a variety of roofing projects. Its lightweight design makes it easy to handle, and the depth adjustment feature allows for precise nail placement, minimizing the risk of damage to your shingles.
This roofing nailer makes a great starter tool due to its affordability and ease of use. The side-loading magazine simplifies nail reloading, saving valuable time on the job. The comfortable grip reduces fatigue, and the durable construction ensures long-lasting performance. If you are looking for a roofing nailer that won’t break the bank but still delivers quality results, the Freeman PCN45 is an excellent option.
Why You Need a Roofing Nailer
Imagine you’re finally tackling that leaky roof, envisioning a dry and cozy home free from drips and worries. Doing it the old-fashioned way with a hammer and nails sounds simple enough, but picture yourself on a hot summer day, endlessly pounding nails, each swing tiring your arm and testing your patience. Not to mention, inconsistent hammering can lead to bent nails, damaged shingles, and ultimately, a less secure roof that’s prone to future leaks. A roofing nailer changes that whole picture.
A roofing nailer, especially the “best roofing nailer” on the market, takes the strenuous work out of roof repair and installation. Instead of manual effort, you get consistent, perfectly driven nails with every press. Think about the time you’ll save! What would have taken days with a hammer can now be accomplished in hours. This not only makes your project quicker but also reduces the risk of errors and injuries.
Beyond speed and precision, the “best roofing nailer” often comes with adjustable depth settings, ensuring you don’t overdrive the nails and damage the shingles. This is crucial for maintaining the integrity and lifespan of your roof. And let’s be honest, the professional-looking finish you’ll achieve with a nailer will significantly boost your home’s curb appeal – a definite plus if you ever decide to sell.
So, if you value your time, energy, and the quality of your roofing project, investing in a roofing nailer is a no-brainer. Forget the sore arm and the inconsistent results. Embrace the efficiency, precision, and professional finish that the “best roofing nailer” can bring. It’s an investment in your home, your comfort, and your peace of mind.
Understanding Different Types of Roofing Nailers
When you’re standing on a roof, hammering away, you’ll quickly realize the importance of having the right tool. Roofing nailers aren’t a one-size-fits-all deal. Some are designed for specific roofing materials like asphalt shingles, while others can handle more diverse tasks. Knowing the difference between a coil roofing nailer and a stick roofing nailer, for example, can save you a lot of frustration.
Coil nailers are typically lighter and hold more nails, making them ideal for larger roofing projects where you need to minimize reload time. Imagine you’re re-roofing an entire house – a coil nailer can drastically reduce the number of times you need to stop and refill. Stick nailers, on the other hand, are often more powerful and can handle thicker materials.
For smaller jobs or repairs, a stick nailer might be a better choice. Think of it this way: if you’re just replacing a few damaged shingles after a storm, lugging around a heavier, high-capacity coil nailer might be overkill. The key is to match the nailer type to the scale and complexity of your roofing task.
Ultimately, understanding the nuances of each type of roofing nailer will empower you to select the right tool for the job, making your work more efficient and safer. It’s about understanding the strengths and weaknesses of each design and matching them to your specific needs.
Essential Safety Gear When Using a Roofing Nailer
Roofing is inherently a dangerous job, and adding a powerful nailer to the mix amplifies those risks. Before you even think about firing your first nail, make sure you’re equipped with the right safety gear. This isn’t just a suggestion; it’s a necessity to protect yourself from serious injuries.
First and foremost, eye protection is non-negotiable. Flying debris, errant nails, or even just dust can cause significant eye damage. Invest in a pair of safety glasses or goggles that fit snugly and provide good visibility. Imagine a nail ricocheting off a shingle and heading straight for your eye – safety glasses could be the difference between a minor scare and a trip to the emergency room.
Next, think about your footing. A sturdy pair of work boots with good traction is essential for maintaining balance on a sloped surface. Roofing boots often have specialized soles designed to grip shingles effectively. Picture yourself slipping on a damp shingle while holding a nailer – a solid pair of boots can prevent a nasty fall.
Finally, don’t forget about hearing protection. The constant noise of a nailer can be damaging to your ears over time. Earplugs or earmuffs will help reduce the noise level and protect your hearing. Think of it like this: you wouldn’t go to a rock concert without earplugs, so why risk your hearing while roofing?
Maintaining Your Roofing Nailer for Longevity
Like any power tool, a roofing nailer requires regular maintenance to keep it running smoothly and prevent costly repairs. Ignoring maintenance can lead to decreased performance, increased risk of malfunctions, and ultimately, a shorter lifespan for your tool. A little bit of upkeep can go a long way in extending the life of your nailer.
One of the most important maintenance tasks is lubricating the nailer’s internal components. A few drops of air tool oil in the air inlet before each use will help keep the parts moving freely and prevent corrosion. Imagine the internal mechanisms seizing up due to lack of lubrication – that’s a recipe for a broken nailer and a frustrating day on the roof.
Another key aspect of maintenance is keeping the nailer clean. Dust, debris, and old nails can clog the internal mechanisms and cause jams. Regularly clean the nailer with compressed air and wipe down the exterior with a clean cloth. Picture all the grit and grime accumulating inside your nailer – regular cleaning prevents those particles from gumming up the works.
Finally, pay attention to the air compressor. Ensure that the air pressure is set correctly according to the nailer’s specifications. Too much pressure can damage the nailer, while too little pressure can result in misfires. Think of it as fine-tuning an engine – the right air pressure is crucial for optimal performance.
Troubleshooting Common Roofing Nailer Problems
Even with proper maintenance, roofing nailers can sometimes experience problems. Knowing how to troubleshoot common issues can save you time and money on repairs. Don’t panic if your nailer suddenly stops working – a simple fix might be all it takes to get it back in action.
One common issue is nail jams. This can occur when nails are bent, damaged, or improperly loaded into the nailer. To clear a jam, disconnect the air hose, open the nail magazine, and remove any obstructions. Imagine the frustration of constantly having to stop and clear jams – properly loading nails and using high-quality fasteners can help prevent this problem.
Another frequent problem is misfires. This can be caused by low air pressure, a worn driver blade, or a dirty air filter. Check the air pressure and clean or replace the air filter if necessary. If the problem persists, the driver blade may need to be replaced. Picture yourself trying to sink nails with a worn-out driver blade – it’s like trying to hammer a nail with a rubber mallet.
Finally, leaking air is a common issue that can reduce the nailer’s performance. Check the air hose connections and the O-rings on the nailer for leaks. Tighten any loose connections and replace any damaged O-rings. Imagine air constantly escaping from your nailer – it’s like trying to fill a bucket with a hole in the bottom.
Choosing the Best Roofing Nailer: A Buyer’s Guide
Hey there! So, you’re in the market for a roofing nailer? That’s fantastic! Whether you’re a seasoned professional or a DIY enthusiast tackling a roofing project for the first time, choosing the right nailer can make all the difference. It can be the difference between a smooth, efficient job and a frustrating, time-consuming one. There are a lot of options out there, and it can be a little overwhelming. But don’t worry, I’m here to help you navigate the world of roofing nailers and find the perfect one for your needs. Think of me as your friendly guide, pointing out the key things to consider before you make that purchase. Let’s get started!
Nailer Type: Pneumatic vs. Cordless
Okay, so first things first, let’s talk about the two main types of roofing nailers you’ll encounter: pneumatic (air-powered) and cordless (battery-powered). Pneumatic nailers are the workhorses of the roofing world. They’re typically more powerful and consistent, especially for heavy-duty tasks. They rely on an air compressor to operate, so you’ll need to factor in the cost and portability of that equipment as well. The upside is that they’re generally lighter than cordless models, since they don’t have a battery weighing them down.
Cordless nailers, on the other hand, offer the freedom of movement. No hoses to trip over or compressors to lug around! This can be a huge advantage, especially if you’re working on a large roof or in a difficult-to-reach area. The technology has improved dramatically in recent years, and many cordless roofing nailers now offer performance comparable to their pneumatic counterparts. However, you’ll need to keep an eye on battery life and invest in extra batteries if you plan on using it for extended periods. Ultimately, the choice boils down to your specific needs and priorities. Do you value power and consistent performance, or portability and convenience? Both types can be the best roofing nailer depending on the situation.
Nail Size and Capacity
Next up, let’s talk about nail size and capacity. This is a crucial factor to consider because it directly impacts the type of roofing materials you can work with. Roofing nailers are designed to use specific nail lengths and diameters, so you’ll want to make sure the nailer you choose is compatible with the type of roofing you’ll be installing. For example, asphalt shingles typically require nails that are 1 1/4″ to 1 3/4″ long, while thicker materials like tile or slate may require longer nails.
The nail capacity of the magazine is also important to consider. A higher capacity means fewer reloads, which can save you a significant amount of time and effort, especially on larger projects. Imagine constantly stopping to reload your nailer every few minutes – that’s a recipe for frustration! Think about the typical size of the roofing projects you’ll be tackling and choose a nailer with a magazine capacity that suits your needs. Remember, the best roofing nailer for you will be the one that can handle the nail size and quantity you need without constant interruptions.
Weight and Ergonomics
Now, let’s talk about something that can really affect your comfort and productivity: weight and ergonomics. Roofing is physically demanding work, and using a heavy or poorly designed nailer can quickly lead to fatigue and even injuries. A lightweight nailer will be much easier to maneuver and control, especially when you’re working overhead or at awkward angles. Trust me, your arms and shoulders will thank you!
Ergonomics is another important factor to consider. Look for a nailer with a comfortable grip, a well-balanced design, and features that minimize vibration. Some models also have adjustable depth settings and belt hooks, which can further enhance your comfort and convenience. Spend some time holding different nailers to see which one feels the best in your hand. You might find that one model is significantly more comfortable than another, even if they have similar specifications. The best roofing nailer is the one that feels like an extension of your arm, not a burden.
Firing Modes: Bump vs. Sequential
Okay, let’s dive into firing modes. Roofing nailers typically offer two main firing modes: bump (or contact) actuation and sequential actuation. Bump firing allows you to fire nails rapidly by simply bumping the nailer against the roofing surface while holding down the trigger. This is generally faster and more efficient for experienced roofers who prioritize speed.
Sequential firing, on the other hand, requires you to press the nailer against the surface and then pull the trigger for each nail. This is a slower, more deliberate process, but it’s also generally considered safer, especially for beginners. It reduces the risk of accidental firing, which is a crucial consideration when working on a roof. Consider your skill level and comfort level when choosing a firing mode. While bump firing can be faster, sequential firing is often the safer option, especially if you’re new to roofing. The best roofing nailer for you will depend on your experience and your comfort level with each firing mode.
Depth Adjustment
Another important feature to look for is depth adjustment. This allows you to control how deeply the nails are driven into the roofing material. If the nails are driven too deep, they can damage the shingles or other roofing materials. If they’re not driven deep enough, they won’t provide a secure hold.
A good depth adjustment mechanism will allow you to fine-tune the nail depth to ensure a flush and secure installation. Look for a nailer with a tool-free depth adjustment, which allows you to make quick and easy adjustments without having to use any extra tools. This can save you a lot of time and hassle, especially if you’re working with different types of roofing materials that require different nail depths. The best roofing nailer will have a reliable and easy-to-use depth adjustment system.
Durability and Build Quality
Let’s be honest, roofing is a tough job, and your nailer is going to take a beating. That’s why it’s so important to choose a nailer that’s built to last. Look for models with durable housings, high-quality components, and robust construction. A well-built nailer will be able to withstand the rigors of daily use and provide you with years of reliable service.
Consider the materials used in the nailer’s construction. Metal housings are generally more durable than plastic housings. Also, check the warranty offered by the manufacturer. A longer warranty is often an indication of higher quality and confidence in the product. Don’t skimp on quality when it comes to your roofing nailer. Investing in a durable and well-built model will save you money in the long run by reducing the need for repairs or replacements. The best roofing nailer is the one that can stand up to the demands of the job and keep you working efficiently for years to come.
Price and Value
Finally, let’s talk about price and value. Roofing nailers can range in price from a few hundred dollars to several hundred dollars, so it’s important to set a budget and find a nailer that offers the best value for your money. Don’t automatically assume that the most expensive nailer is the best. Consider the features, performance, and durability of each model and compare them to their price.
Read online reviews and ask for recommendations from other roofers to get a better sense of the real-world performance of different nailers. Also, factor in the cost of accessories, such as air compressors (for pneumatic nailers) and extra batteries (for cordless nailers). Remember, the best roofing nailer isn’t necessarily the cheapest or the most expensive. It’s the one that provides the best combination of features, performance, durability, and price for your specific needs.
FAQ
What’s the difference between a coil roofing nailer and a stick roofing nailer?
Coil roofing nailers and stick roofing nailers primarily differ in how the nails are loaded. Coil nailers use, well, a coil of nails that are fed automatically, allowing for faster and more continuous nailing. This can be a real time-saver on larger roofing projects, especially if you’re working solo.
Stick nailers, on the other hand, load nails in strips, similar to a magazine in a gun. They tend to be lighter and more maneuverable, which can be a benefit if you’re working in tight spaces or on steep pitches. The choice really comes down to your preference for speed versus maneuverability and the scale of your roofing job.
How do I choose the right nail size for my roofing project?
Choosing the correct nail size is super important for a secure and long-lasting roof. Generally, you want nails that are long enough to penetrate through the roofing material and at least ¾ inch into the sheathing below. Shorter nails might not hold well, leading to leaks and blow-offs during windstorms.
Factors like the type of roofing material (asphalt shingles, metal, etc.) and the thickness of your sheathing will also play a role. Always check the manufacturer’s recommendations for the specific roofing material you’re using – they usually have specific nail size guidelines. When in doubt, a slightly longer nail is generally better than a nail that’s too short, but be mindful of penetrating all the way through the roof sheathing.
What safety precautions should I take when using a roofing nailer?
Safety first, always! Roofing nailers can be powerful tools, so it’s crucial to protect yourself. Always wear safety glasses to shield your eyes from flying debris and errant nails. It’s also a good idea to wear a hard hat, especially if you’re working on a roof where there’s a risk of falling objects.
Hearing protection is another must. Roofing nailers can be quite loud, and prolonged exposure to that noise can damage your hearing. And finally, make sure to wear sturdy work boots with good traction to prevent slips and falls. Following these precautions will help keep you safe and sound while you’re working on your roof.
What does “depth adjustment” mean on a roofing nailer and why is it important?
Depth adjustment simply refers to the ability to control how far the nail is driven into the roofing material and sheathing. It’s a crucial feature because you don’t want to overdrive the nails, which can damage the shingles and create weak spots. On the flip side, you don’t want to underdrive them either, as they won’t properly secure the roofing material.
Think of it like Goldilocks and the Three Bears – you need the depth to be “just right.” Most roofing nailers have a dial or knob that allows you to easily adjust the depth setting. Experiment on a scrap piece of roofing material to find the sweet spot before you start nailing the actual roof.
How do I maintain my roofing nailer to keep it working properly?
Regular maintenance is key to keeping your roofing nailer running smoothly for years to come. Start by lubricating the nailer regularly with a pneumatic tool oil. A few drops of oil in the air inlet before each use can make a big difference.
Also, keep the nailer clean. Blow out any dust, debris, or old nails with compressed air after each use. Check the hose connections and fittings to ensure they’re tight and leak-free. Following these simple steps will help prevent jams, extend the life of your nailer, and ensure consistent performance.
Pneumatic or cordless roofing nailer – which is better for me?
Choosing between a pneumatic and a cordless roofing nailer really depends on your specific needs and preferences. Pneumatic nailers are generally more powerful and consistent, as they’re powered by an air compressor. This can be a big advantage for larger jobs or when working with tougher roofing materials.
Cordless nailers, on the other hand, offer greater freedom and portability. You don’t have to drag around an air compressor and hose, which can be a huge convenience if you’re working on a roof with limited access. They’re also a good option for smaller repair jobs where you don’t want the hassle of setting up a compressor. Consider the size and type of projects you’ll be tackling most often when making your decision.
What should I do if my roofing nailer keeps jamming?
A jammed roofing nailer can be a real headache, but there are a few things you can try to troubleshoot the problem. First, make sure you’re using the correct type and size of nails for your nailer. Using the wrong nails is a common cause of jams.
Next, check the nailer’s magazine and make sure it’s clean and free of debris. Also, ensure that the nail strips or coil are properly loaded. If the problem persists, try lubricating the nailer with pneumatic tool oil, as a lack of lubrication can sometimes cause jams. If none of these steps work, you might need to consult the owner’s manual or take the nailer to a qualified repair technician.
Conclusion
So, there you have it! You’re now armed with the knowledge to find the best roofing nailer for your needs, whether you’re tackling a major renovation or a quick repair. Remember, choosing the right tool is half the battle. Consider your project size, frequency of use, and preferred power source, and you’ll be nailing those shingles down like a pro in no time.
Don’t let roofing projects intimidate you! With the right information and the perfect roofing nailer in your hand, you’ve got this. Now get out there, choose the tool that speaks to you, and transform that roof into something you’re truly proud of. Happy hammering!