Remember that time you were camping with friends, far from city lights, and someone pointed to the velvety night sky, bursting with more stars than you ever thought possible? Maybe you strained your eyes, trying to make out the rings of Saturn or the craters of the moon, wishing you had a closer look. That feeling of wonder, that itch to explore the cosmos, is universal. For many of us, that desire comes with a practical constraint: budget. The good news is that you don’t need to break the bank to start your astronomical journey.
That’s why we’ve put together this guide, focusing on the best telescopes under $150. We know that diving into astronomy can seem intimidating, with all the jargon and equipment options. But we’re here to simplify things, offering honest reviews and helpful advice so you can choose the perfect telescope to spark your curiosity and open up a universe of possibilities, all without emptying your wallet. Get ready to explore the cosmos!
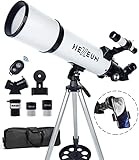
Before we jump into the best telescopes under $150 review, let’s take a look at these Amazon products:


Last update on 2026-02-16 / Affiliate links / #CommissionsEarned / Images from Amazon Product Advertising API
Reaching for the Stars (Without Emptying Your Wallet)
Ever looked up at the night sky and felt that irresistible pull, that yearning to see just a little bit closer? You’re not alone! For centuries, humanity has been captivated by the cosmos, and thankfully, you don’t need to be an astrophysicist (or rich) to get a better view. The good news is that dipping your toes into astronomy doesn’t require a fortune. In fact, with a bit of research, you can find some surprisingly capable instruments that won’t break the bank.
That’s exactly what we’re diving into: the exciting world of affordable astronomy. We’re talking about finding the best telescopes under $150 – a price point where accessibility meets genuine stargazing potential. This isn’t about professional-grade observatory equipment, of course. It’s about getting a fantastic first experience, learning the constellations, and maybe even spotting a planet or two. Think of it as a gateway to a lifelong passion!
What can you realistically expect to see with the best telescopes under $150? Well, the Moon will become a breathtaking, crater-filled landscape. You’ll likely be able to identify the brighter planets in our solar system, like Jupiter and Saturn (though maybe not with super-crisp detail). Under dark skies, you might even glimpse some of the brighter nebulae and star clusters. While the Hubble Space Telescope cost billions, you’ll be amazed at how much you can experience with just a small investment.
Finding the right telescope at this price point can be a bit of a treasure hunt. There are a lot of options out there, and some are definitely better than others. Our goal is to help you navigate the maze and find a telescope that’s both functional and enjoyable to use. So, get ready to explore! We’ll cover the key features to look for, highlight some top contenders, and give you the inside scoop on making the most of your budget-friendly stargazing journey.
The Best Telescopes Under $150
Celestron PowerSeeker 70AZ Telescope
Looking for a budget-friendly entry into the world of stargazing? The Celestron PowerSeeker 70AZ is a solid choice. It’s a refractor telescope, meaning it uses lenses to gather light, and with a 70mm aperture, it can pull in enough light to reveal some cool celestial objects. Expect decent views of the Moon’s craters, Jupiter’s moons, and even a glimpse of Saturn’s rings under good conditions. It’s relatively easy to set up, making it great for beginners who might be intimidated by more complex telescopes.
However, keep in mind this is an entry-level instrument. The included accessories, like the eyepieces and finderscope, are decent but not top-of-the-line. You might find yourself wanting to upgrade them later for a better viewing experience. Also, the mount can be a little shaky, so finding a stable viewing spot is key. Overall, the PowerSeeker 70AZ is a fantastic starter scope for those curious about exploring the night sky without breaking the bank.
Gskyer 70mm Aperture 400mm AZ Telescope
The Gskyer 70mm AZ telescope offers a compelling blend of affordability and functionality. It’s another refractor-style telescope with a 70mm aperture, giving you a similar light-gathering capability to the Celestron PowerSeeker. The 400mm focal length provides a wider field of view, making it easier to locate and track celestial objects. The included adjustable tripod and smartphone adapter are welcome additions, allowing you to capture and share your discoveries.
While the Gskyer boasts impressive features for its price point, it’s still a budget telescope. Image quality might not be as crisp and detailed as you’d find in more expensive models. The accessories, while helpful, are basic. The tripod, while adjustable, may exhibit some wobble. Despite these limitations, the Gskyer 70mm AZ is an excellent starting point for budding astronomers looking for a user-friendly and feature-rich telescope without emptying their wallets.
Orion FunScope 76mm TableTop Reflector Telescope
The Orion FunScope 76mm is a reflector telescope, meaning it uses mirrors to gather light, which is a slightly different approach than refractors. Its tabletop design makes it super portable and easy to set up almost anywhere. The 76mm aperture gathers a good amount of light for its size, giving you surprisingly good views of the Moon, planets, and even some brighter deep-sky objects like the Orion Nebula. Plus, the wide field of view is great for scanning the sky.
Now, being a tabletop telescope, it doesn’t come with a full-sized tripod. You’ll need a stable surface to place it on, like a picnic table or a sturdy box. Also, while the views are impressive for the price, don’t expect Hubble-quality images. It’s designed for fun and exploration, not detailed observations. Still, the FunScope is a fantastic grab-and-go option for beginners and anyone who wants a compact and easy-to-use telescope.
BARSKA Starwatcher 400 Power Telescope
The Barska Starwatcher 400 is a refractor telescope designed with beginners in mind. Its 70mm aperture and 400mm focal length strike a good balance between light gathering and ease of use. The included accessories, such as multiple eyepieces and a finderscope, provide a starting point for exploring different magnifications and locating celestial objects. It also comes with a sturdy, adjustable tripod for stable viewing.
While the Barska Starwatcher 400 offers a comprehensive package for beginners, it’s essential to manage expectations. As with other telescopes in this price range, image quality may not be exceptional, and some chromatic aberration (color fringing) may be noticeable, especially on brighter objects. The included accessories are functional, but upgrading them in the future could improve the overall viewing experience. Nevertheless, the Barska Starwatcher 400 presents a solid entry point into amateur astronomy, providing a decent balance of features and affordability.
Emarth Telescope 70mm Aperture 400mm Refractor Telescope
The Emarth 70mm Refractor Telescope offers an accessible entry into stargazing. Its 70mm aperture gathers a sufficient amount of light for observing the Moon, planets, and some brighter deep-sky objects. The 400mm focal length provides a reasonably wide field of view, making it easier to locate and track celestial objects. The included tripod and finderscope aid in setup and object location.
However, like other telescopes in this price bracket, the Emarth 70mm has its limitations. Image quality won’t rival more expensive models, and the build quality might feel less robust. The tripod, while functional, may exhibit some instability. Despite these shortcomings, the Emarth 70mm Refractor Telescope serves as a worthwhile option for beginners seeking an affordable and user-friendly telescope to begin their astronomical journey. Its ease of use and decent optics make it a suitable starter scope.
Why Buy a Telescope Under $150?
Think of those clear nights when the moon hangs fat and bright in the sky. Wouldn’t it be incredible to see its craters and lunar seas up close? Or maybe you’ve always been curious about those faint pinpricks of light that are actually distant planets. You don’t need a high-end, expensive telescope to start exploring the cosmos. A telescope under $150 can open up a whole new world of discovery without breaking the bank. It’s a fantastic way to introduce yourself, or your children, to the wonders of astronomy.
For many, the biggest hurdle to getting into astronomy is the perceived cost. It’s easy to assume you need to spend hundreds or even thousands of dollars to see anything worthwhile. However, the “best telescopes under $150” offer a significant step up from unaided eyesight, revealing details of the moon, brighter planets like Jupiter and Saturn, and even some nebulae and star clusters. Imagine showing your kids Saturn’s rings for the first time – that’s an experience money can’t truly buy, but a budget-friendly telescope can facilitate.
Moreover, these telescopes are usually more portable and easier to set up than their larger, more complex counterparts. This makes them perfect for taking on camping trips or simply setting up in your backyard on a whim. Instead of wrestling with complicated equipment, you can be observing the night sky in minutes, fostering a spontaneous love for astronomy. A cumbersome, expensive telescope can easily end up gathering dust in the attic, but a simple, accessible one will actually get used!
Ultimately, buying a telescope under $150 is about accessibility and fostering a passion for exploration. It’s an affordable gateway to a universe of wonder, allowing you to learn the basics, discover your interests, and ignite a lifelong love of astronomy. You can always upgrade later, but starting small ensures you’ll actually use your telescope and make the most of the celestial show above us.
Understanding Telescope Specifications: What Do They Really Mean?
Ever felt lost looking at telescope specs? Things like aperture, focal length, and magnification can seem like a foreign language. But understanding these terms is key to choosing the right telescope for your needs, especially when working with a tighter budget. Think of it like buying a car – you wouldn’t just look at the price tag, would you? You’d want to know about the engine, mileage, and safety features. Telescope specs are the equivalent for exploring the night sky.
Aperture, usually measured in millimeters or inches, is essentially the telescope’s “eye.” It’s the diameter of the main lens or mirror that collects light. The larger the aperture, the more light the telescope gathers, allowing you to see fainter objects. Imagine trying to read a book in dim light – a larger light source makes it much easier. Similarly, a bigger aperture reveals more detail in celestial objects like nebulae and galaxies.
Focal length and magnification are often confused. Focal length (also in millimeters) is the distance between the lens/mirror and the point where light converges to form an image. Magnification, on the other hand, is a calculated value – focal length of telescope divided by focal length of the eyepiece. While high magnification sounds appealing, it’s not always beneficial. It amplifies atmospheric turbulence, leading to blurry images. Think of trying to zoom in too much on a digital photo – it becomes pixelated and loses detail.
In the under $150 price range, you’ll likely encounter telescopes with smaller apertures. Don’t be discouraged! Even with a smaller aperture, you can still enjoy fantastic views of the Moon, planets like Jupiter and Saturn, and brighter deep-sky objects like the Orion Nebula. It’s about knowing what your telescope is capable of and setting realistic expectations.
Mount Types: Choosing the Right Support System
The telescope mount is the unsung hero of your stargazing experience. It’s what holds your telescope steady and allows you to smoothly track objects as they move across the sky. Think of it as the tripod for your camera – a stable mount is crucial for clear, wobble-free views. Without a good mount, even the best optics will be wasted.
There are two main types of mounts commonly found on telescopes under $150: alt-azimuth and equatorial. Alt-azimuth mounts move up and down (altitude) and left and right (azimuth), similar to how a camera tripod works. They’re simple to use, making them a good choice for beginners. Imagine showing a friend the Moon through your telescope – an alt-azimuth mount allows you to easily point and adjust the view.
Equatorial mounts are designed to compensate for Earth’s rotation. They have one axis aligned with the Earth’s axis, allowing you to track celestial objects with a single smooth motion. While they can be a bit more challenging to set up initially, they’re ideal for longer observing sessions or astrophotography. Think of trying to follow a bird in flight – an equatorial mount makes it much easier to keep the object in your field of view.
In the budget-friendly category, mounts are often one of the areas where manufacturers cut costs. This can lead to wobbly or unstable mounts that make observing frustrating. Before purchasing, read reviews carefully and consider the mount’s stability. If possible, test the mount in person to see how smoothly it moves and how well it dampens vibrations. A sturdy mount is an investment in your enjoyment of astronomy.
Consider this – a shaky mount is like trying to take a photo on a boat. Even the slightest movement can blur the image. Similarly, a wobbly telescope mount will make it difficult to achieve clear, detailed views of celestial objects.
Location, Location, Location: Finding the Darkest Skies
Finding a dark sky is perhaps the single most important factor in enjoying astronomy, regardless of the telescope you use. Light pollution from cities and towns washes out the faint light from stars and deep-sky objects, making them difficult or impossible to see. Think of trying to watch a movie on your phone in bright sunlight – you can barely see anything.
The darker your sky, the more you’ll see. Even a modest telescope can reveal a surprising amount of detail under dark skies. You don’t need to trek to the middle of nowhere to find dark skies, but you do need to get away from the brightest urban areas. Consider driving just an hour or two outside the city to a more rural location. Use a light pollution map to identify areas with darker skies near you.
Once you’ve found a darker location, take some time to let your eyes adjust to the darkness. This process, called dark adaptation, takes about 20-30 minutes. Avoid looking at bright lights during this time, as it will reset your dark adaptation. Imagine walking into a dark room after being outside in bright sunlight – it takes a while for your eyes to adjust and see things clearly.
When observing from a darker location, you’ll be amazed at how much more you can see. Stars will appear brighter and more numerous, and you may even be able to spot the Milky Way stretching across the sky. Even common objects like the Moon will appear more detailed and impressive. Think of discovering a hidden world you never knew existed. The darkness unveils the universe.
Remember the analogy of the movie screen? The darker the room, the more vibrant and detailed the image appears. The same principle applies to stargazing. The less light pollution, the more detail and fainter objects you’ll be able to observe.
Maintenance and Care: Keeping Your Telescope in Tip-Top Shape
A telescope, like any piece of equipment, needs regular maintenance and care to keep it performing at its best. While telescopes under $150 may not require extensive maintenance, taking a few simple steps can significantly extend their lifespan and ensure optimal performance. Think of it as maintaining a bicycle – a little bit of care can prevent major problems down the road.
One of the most important things you can do is keep your telescope clean. Dust and fingerprints on the lenses or mirrors can scatter light and reduce image clarity. Use a soft brush or microfiber cloth to gently remove any dust or debris. Avoid using harsh chemicals or abrasive cleaners, as they can damage the coatings on the optics. Imagine trying to see through a dirty window – cleaning it will dramatically improve your view.
When not in use, store your telescope in a dry, dust-free location. A telescope bag or case is ideal for protecting it from the elements. Avoid leaving your telescope outside overnight, as moisture and temperature changes can damage the optics and electronics. Think of it as protecting your furniture from the sun and rain – proper storage will keep it in good condition for longer.
Finally, handle your telescope with care. Avoid dropping it or bumping it against hard surfaces. A telescope is a precision instrument, and even a small impact can misalign the optics. If you’re traveling with your telescope, be sure to pack it securely to prevent damage. Think of it as handling delicate glassware – treat it with respect, and it will last for years to come.
It’s like keeping your car well-maintained. Regular oil changes and tire rotations can prevent major breakdowns and keep your car running smoothly for years to come. Similarly, cleaning your telescope lenses and storing it properly will keep it performing at its best for many years to come, providing you with countless nights of astronomical enjoyment.
Your Guide to Finding the Best Telescopes Under $150
Hey there, stargazing enthusiast! So, you’re looking to explore the cosmos without breaking the bank? Fantastic! The universe is vast and fascinating, and thankfully, you don’t need a NASA-sized budget to get a glimpse. This guide is all about helping you navigate the world of telescopes under $150 and find the perfect one to kickstart your astronomical adventures. We’ll break down the key things to consider, making sure you get the most bang for your buck and avoid common pitfalls. Let’s dive in and get you ready to observe!
Aperture: The Bigger, The Better (Usually!)
Think of aperture as the telescope’s light-gathering power – it’s the diameter of the main lens or mirror. The larger the aperture, the more light the telescope can collect, allowing you to see fainter and more distant objects. With a larger aperture, you’ll be able to observe details on the Moon, brighter planets like Jupiter and Saturn, and even some of the brighter deep-sky objects like the Orion Nebula. Generally, for telescopes under $150, you’ll find apertures ranging from 50mm to 70mm, maybe even pushing to 80mm in some cases.
When searching for the best telescopes under $150, prioritizing aperture is crucial, but remember to keep the other factors in mind as well. Don’t be swayed by a huge magnification number if the aperture is tiny. Magnification without sufficient light is like trying to read a book in a dark room – you can try to make it bigger, but you still can’t see anything! A good balance between aperture and other features is what you want to aim for.
Magnification: Don’t Get Hooked on Huge Numbers
Magnification is the ability of the telescope to enlarge the image of a distant object. It’s often advertised as a selling point, but don’t fall into the trap of thinking that higher magnification always equals a better view. In reality, excessive magnification can make the image blurry, dim, and shaky, especially in less expensive telescopes. It all circles back to the aperture – you need enough light to support high magnification.
Think of it like zooming in too much on a digital photo. At some point, the image becomes pixelated and loses detail. The same applies to telescopes. With the best telescopes under $150, you’ll typically get eyepieces that offer a range of magnifications. It’s often better to start with a lower magnification to get a wider field of view and then gradually increase it until the image starts to degrade. A stable mount is also crucial at higher magnifications.
Mount Type: Stability is Key
The mount is the structure that supports the telescope and allows you to point it at different parts of the sky. There are two main types of mounts: altazimuth and equatorial. Altazimuth mounts move up and down (altitude) and left and right (azimuth), which is intuitive for beginners. Equatorial mounts, on the other hand, are aligned with the Earth’s axis and allow you to easily track objects as they move across the sky due to the Earth’s rotation.
While equatorial mounts are great for astrophotography, they can be a bit more complex to set up and use. For the best telescopes under $150, you’ll most likely find altazimuth mounts. The most important thing is to ensure that the mount is sturdy and stable. A wobbly mount will make it difficult to get a clear image, especially at higher magnifications. Look for mounts with adjustable legs and a solid base. Even a slight breeze can cause vibrations if the mount is flimsy.
Optical Quality: Glass Matters!
The quality of the lenses or mirrors used in the telescope is crucial for image clarity and sharpness. Ideally, you want optics made from high-quality glass with minimal imperfections. Some cheaper telescopes use plastic lenses, which can distort the image and reduce light transmission. While it’s hard to determine the exact quality of the optics without testing the telescope yourself, you can look for reviews and user feedback that mention image sharpness and clarity.
Keep in mind that even the best telescopes under $150 will have some limitations in terms of optical quality compared to more expensive models. However, you can still find telescopes that offer decent image quality for the price. Look for telescopes that have coated optics, which helps to reduce glare and improve light transmission. Also, check if the telescope has been properly collimated (aligned), as misalignment can significantly affect image quality.
Ease of Use: Beginner-Friendly Features
If you’re new to astronomy, you’ll want a telescope that’s easy to set up and use. Look for features that make the observing experience more enjoyable, such as a simple focusing mechanism, clear instructions, and a user-friendly mount. Some telescopes come with finderscopes, which are small, low-magnification telescopes that help you locate objects in the sky.
While star charts and astronomy apps can be helpful, a good finderscope can make a big difference, especially when you’re starting out. When considering the best telescopes under $150, think about the whole experience. Is the telescope lightweight and easy to carry? Are the eyepieces easy to swap out? Does it come with any helpful accessories, like a cleaning cloth or a carrying case? These small details can make a big difference in your overall enjoyment.
Included Accessories: What Comes in the Box?
Telescopes often come with a variety of accessories, such as eyepieces, finderscopes, and filters. The quality and usefulness of these accessories can vary, so it’s important to consider what’s included when making your decision. Eyepieces determine the magnification of the telescope, so it’s good to have a few different ones to choose from. A finderscope helps you locate objects in the sky, and filters can enhance the view of certain celestial objects.
It’s tempting to think more accessories are always better, but focus on quality. Having two decent eyepieces is better than having five poor ones. Similarly, a well-designed finderscope is much more helpful than a flimsy one. When looking for the best telescopes under $150, read the fine print to see exactly what you’re getting. And remember, you can always upgrade accessories later as your interest in astronomy grows.
Reviews and Reputation: Learn from Others’ Experiences
Before you buy any telescope, it’s always a good idea to read reviews from other users. This can give you valuable insights into the telescope’s performance, ease of use, and overall value. Look for reviews that mention specific aspects of the telescope, such as image quality, mount stability, and included accessories. Pay attention to both positive and negative reviews, and try to get a sense of the overall consensus.
Keep in mind that everyone’s experience is different, and some users may have unrealistic expectations for a telescope under $150. However, if you see a consistent pattern of negative feedback, it’s probably best to steer clear. Search for reviews specifically mentioning “best telescopes under $150” to filter out results for more expensive models. Also, check the reputation of the brand. Established brands often have better quality control and customer support.
FAQ
What type of objects can I expect to see with a telescope under $150?
That’s a great question! Telescopes in this price range are perfect for beginners to explore the night sky. You can expect to see the Moon in incredible detail, with craters, mountains, and valleys all clearly visible. The brighter planets like Jupiter (and its moons), Saturn (and its rings, though a bit small), and Mars will also be within reach. You might even be able to spot Venus and Mercury as “morning stars” or “evening stars” depending on their position.
Don’t expect Hubble-like images, though! Deep-sky objects like nebulae and galaxies will appear as faint, fuzzy patches of light. Think of it as a starting point to pique your interest and learn the basics of stargazing. These telescopes are designed to provide a fun and educational experience, helping you learn about the constellations and navigate the night sky.
What magnification power do I really need?
Magnification is often overemphasized, especially when considering budget telescopes. More magnification isn’t always better! Image quality and stability are much more important. Think of magnification as a way to zoom in on a smaller portion of the sky. However, as you zoom in, the image can become dimmer and blurrier if the telescope’s optics aren’t up to par.
A good rule of thumb is to focus on the quality of the optics first. A lower magnification with a clear, bright image is far more enjoyable than a high magnification with a dim, blurry one. In general, for a telescope in this price range, a maximum useful magnification of around 100x-120x is realistic. Pay more attention to the aperture (the size of the lens or mirror) as that determines how much light the telescope can gather, leading to brighter and clearer images.
Are these telescopes easy to set up?
Yes, generally telescopes in this price range are designed with beginners in mind and are fairly easy to set up. Most come with clear instructions, and the assembly process usually involves attaching the telescope tube to the mount and adding the tripod legs. It’s similar to assembling a simple piece of furniture.
Don’t be intimidated! If you run into any snags, there are tons of helpful videos and guides online that walk you through the process step-by-step. The goal is to get you observing the night sky as quickly and easily as possible, so manufacturers try to make the setup as straightforward as they can. Take your time, follow the instructions, and you’ll be ready to stargaze in no time.
Will I need any additional accessories?
While the telescopes generally come with everything you need to get started, there are a few accessories that can significantly enhance your viewing experience. A good beginner accessory is a planisphere, a rotating star chart that helps you identify constellations. A red flashlight is also a must-have, as it preserves your night vision while you’re stargazing.
Another useful accessory is a carrying case to protect your telescope during transportation and storage. While not essential, these extras can make your stargazing adventures more enjoyable and convenient. However, you definitely do not need to purchase them to start enjoying your telescope right away.
What’s the difference between a reflector and a refractor telescope?
Reflector telescopes use mirrors to gather and focus light, while refractor telescopes use lenses. Refractors are often long and thin, while reflectors tend to be shorter and wider. In the under $150 price range, both types have their pros and cons.
Reflectors generally offer a larger aperture (light-gathering ability) for the price, which can result in brighter images. However, they might require occasional collimation (aligning the mirrors). Refractors are often easier to maintain and can provide sharper images at lower magnifications, but they may have smaller apertures. Ultimately, the best choice depends on your personal preference and what you plan to observe.
How do I find objects in the night sky?
Learning to navigate the night sky is part of the fun! Start with the bright, easy-to-find objects like the Moon and planets. Use a star chart or a stargazing app on your phone to locate constellations and prominent stars. Slowly learn to identify these landmarks, and you’ll gradually become more familiar with the night sky.
A good trick is to use your finder scope (a small, low-magnification telescope attached to the main telescope) to help you aim. Align the finder scope with the main telescope during the day so they point in the same direction. Then, use the finder scope to center the object you want to view before looking through the main telescope. Practice makes perfect, so don’t be discouraged if you don’t find everything right away.
What if I’m not happy with the telescope’s performance?
That’s a valid concern, and it’s important to have realistic expectations. Telescopes in this price range are entry-level instruments designed to introduce you to the wonders of stargazing. While they may not deliver professional-grade images, they can still provide a rewarding experience.
If you’re truly unhappy with the telescope’s performance, check the return policy of the retailer you purchased it from. Many offer a satisfaction guarantee, allowing you to return the telescope for a refund. Also, consider reaching out to online astronomy communities or forums for advice and troubleshooting tips. Sometimes, a simple adjustment or a change in observing location can make a big difference.
Final Thoughts
So, there you have it! A universe of possibilities opens up when you explore the cosmos, and the best telescopes under $150 provide an accessible starting point. We’ve armed you with the knowledge to confidently choose a telescope that fits your needs and budget. Don’t let the price tag fool you; these instruments are gateways to wonder, offering stunning views of the moon, planets, and even glimpses into distant nebulae. Remember, the best telescope is the one you’ll actually use!
Now, it’s time to take the plunge! Pick the telescope that resonates with you, set it up under a clear night sky, and prepare to be amazed. The universe is calling, and adventure awaits. Happy stargazing!